Looking for a new pair of On Shoes and not sure which size to get? Check out our guide to find the perfect size On Shoe for you, and shop with confidence! And check out our On Shoe Size Chart to figure out the exact size.
Once you figure out the perfect size, shop On Shoe Styles here!
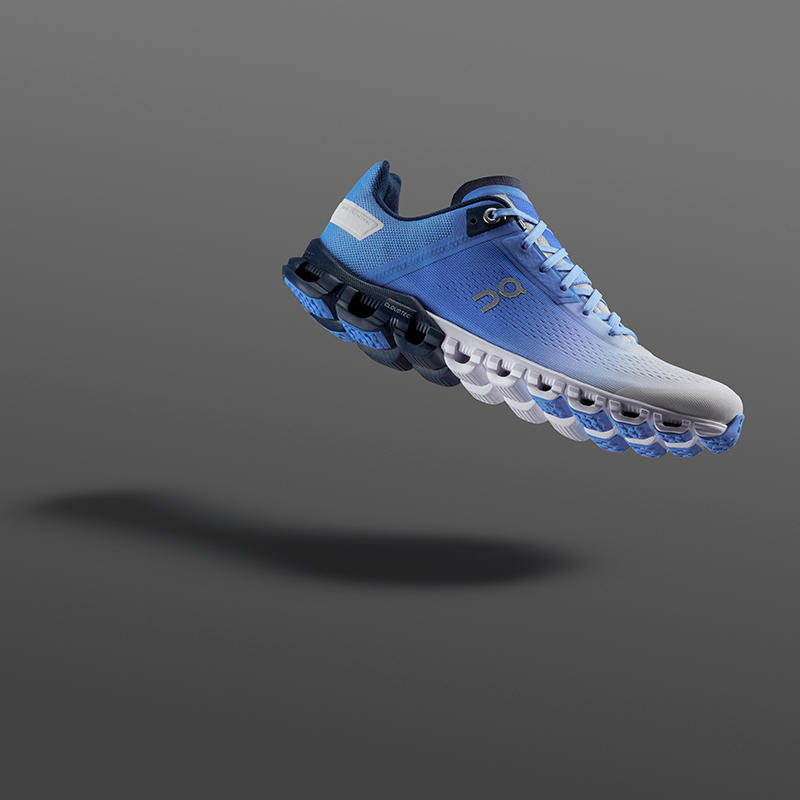
On Cloud Shoes come in a lot of different styles, supports, and sizes.
It’s not always easy to find your exact size in a new shoe. So, find the right fit using these tips and tricks.
Figure out the activities and environments you’re going to use your On Clouds in.
If you’re running, exercising, or hiking, that’ll make a difference in the fit you need. If you’re wearing them out and about, with casual or work wear, you’ll have different needs from the fit.
Take your shoe measurements. The easiest way to get your foot measured is heading out to one of our stores, but you can do it at home too. Measuring your foot is super easy. Check out this guide from WikiHow to get your foot measurements. Now, you can compare that measurement to the shoe’s size in Centimeters. Use our On-Running Size Chart to find the perfect fit!
Do you need additional support for pronation or injuries? Pronation is simply the natural roll of your foot to the left or right. Sometimes you need more support to counteract the long-term effects of it. You can find more info here.
Now that you know your activity, support needs, and foot measurements, let’s check out some On-Clouds! A general rule of thumb with On-Cloud’s is that they fit like most running shoes, with a few exceptions.
For runners who need a cushioned, lightning-fast shoe:
If we just described you, look for a solid heel lock and forefoot strike for controlled and explosive takeoffs. On’s running options include daily trainers like the Cloudswift and the Cloudflow. There are other more technical options too, like the Cloudflyerand Cloud X. These running styles feature a classic fit and match your normal size, most of the time. Although, you should go a half-size smaller from your size in Nike Flyknit or Asics shoes.
If you’re used to running in more cushioned shoes like Brooks, Saucony, or Hoka, you want a shoe with space. Go for a more supportive shoe like the Cloudmonsterfor road-running, and the Cloudvistafor trail-running. These shoes feature a roomy fit with enhanced midsole support. So, they’re perfect for flat-footed runners who need extra toebox space.
For everyday wear, so you can stay comfortable and stylish:
Comfortable and stylish, in other words, the iconic and updated Cloud 5is a great choice. This updated style is easy to fit as the updated style is true to size. This makes them great for everyday wear and travel. Usually, your best bet is to go with your regular size. If you jump between half-sizes often though, it’s better to go with the half-size up.
Wider feet struggle to find the perfect fit since the Cloud features a narrow toebox and a roomier heel. If your size in Nike or Asics feels slightly tight or takes some breaking in, try a half-size down in the Clouds. *Insider tip: some women with a wider foot find success in the men’s style as it is naturally a wider profile.
Overall, it’s simple to find your size in On-Cloud running shoes. Look at your normal shoe sizes and know the basic shape and needs of your foot. Knowing this, as well as the ideal fit and performance for your activities, is crucial. That way, you can get your next pair of Clouds with confidence! And remember, if you need help, feel free to reach out to us in-store or online via webchat or phone, we’re happy to help! Enjoy life in the Clouds.
Interested in shopping On by your activity? Click here to find the pair that is best for you. We want everyone to enjoy the outdoors, and we work to build loyalty one connection at a time. Visit one of our stores or take advantage of our shipping or curbside pickup! #BeOutdoors
When you’re heading out on your first big trip, whether it’s backpacking, car camping, or going for a day hike, it’s important to pack smart. Packing smart doesn’t just mean packing light, it means ensuring the best layout of your gear to keep you safe, comfortable, and feeling good on the trail. So, we’ve broken down some top tips to help you pack smarter.
1. Organize, organize, organize!
The first step to packing smarter is to organize. It sounds simple, but it’s often easy to underestimate how organized you need to be. A quick weekend trip can go from fun to dangerous if your pack isn’t organized correctly. You can forget essential gear, stow gear incorrectly so it gets wet or warped in the sun, and even hurt yourself by packing your gear wrong in your backpack.
Some people like using packing cubes or dry bags, while others prefer keeping things in simple gallon freezer bags. Anything that keeps your gear sorted, organized, and accessible in your pack is helpful. Not only does it make your stuff easier to find and put back, but it prevents messes, keeps essentials like sunscreen and snacks close on hand, and makes it way easier to unpack when you get home.
2. Plan your trip in your bag
First, you need to layout all your gear by day, activity, or whatever makes the most sense to you. Think through the timeline of your trip, and ask yourself questions like where will you be when you need fresh socks or a flashlight? It’s going to save you a lot of effort to put essentials like socks and underwear up at the top of the pack, rather than shoving them in a spare pair of boots that are buried with heavy tents and sleeping pads at the bottom of your pack.
Once you’ve answered those questions, you can map out your pack access to ensure things are laid out in the most efficient way possible. This means doing things counterintuitively sometimes. Maybe it’s better to pick out each day’s outfit in advance and have each outfit in its own bag, rather than bundling all your socks, shirts, and pants. That way, each bag can hold your dirty clothes in the same spot it was in before, rather than needing to add a second bag of dirty clothes while you’re on the trail.
It’s also helpful to write down a ‘pack itinerary’ that lists what you’llneed and where your necessary gear is in the pack, that way you can find it fast and put things back where they belong.Now that’s a lot of planning, but the key is that the best packing system is the one you use. Try a couple of different ideas and see what works best for you.
3. Shakedown and pack out
The last and most important step, do a shakedown and figure out what and how you’ll need to pack out. A shakedown is where you pack and then unpack your backpack anticipating exactly what you’ll need. If it’s your first time going out on any type of hike, you can come by your local Alabama Outdoors for a free pack shakedown and get some expert advice on what you need!
When you shakedown your pack, you want to ensure everything you have is necessary for the trip, in good working condition, and sized down to fit in your backpack. You should pack your backpack just like you would for the trail, so with the heaviest stuff at the bottom. Then, weigh the pack and check that it isn’t too heavy. Usually, your pack shouldn’t weigh more than 20% of your body weight for an overnight tripand only 10% for a daytrip.
Now that you’ve done your shakedown, put on your pack and walk with it on for a bit to ensure it isadjusted correctly andcomfortable for you. Finally, go through and plan out where you will put trash, dirty clothes, and other refuse that you want to keep separate from your clean items. Leave space for it in your pack and make sure it’llall fit on the trip out.
Well, those are the basics to packing smarter! To learn more about backpacking, check out our other blogs and shop for top backpacking gear here.
Ready to be outdoors this Spring? We have the Springoutdoor gear you need to get you back on the trails! We want everyone to enjoy the outdoors, and we work to build loyalty one connection at a time.Visit one of our storesor take advantage of our shipping or curbside pickup! #BeOutdoors
If you’re working, exploring or playing outside, your clothing is arguably your most important equipment. If you layer your clothing correctly, it can keep you warm (or cool) and dry. Layering divides up your clothing so that you can add or remove as much as the weather calls for without your clothes getting too bulky or leaving you too exposed. Here’s our guide on how to layer!
This is your first layer of clothing, the items you wear directly against your skin. The base layer for cold weather conditions is typically tight against the skin. That way, it reflects more heat back to the body. Base layers for warm weather should be looser so that air can flow between the garment and your body, helping you cool down. Think thermal/long underwear, t-shirts, socks and gloves. What you’re looking for is something that will add a little warmth but also wick moisture away and dry quickly. You may feel fine when you’re doing some sort of exercise, but once you start cooling down, any moisture held against your skin is going to make you that much colder. Look for items made from polyester or Merino wool. We loveIcebreaker’s iconic line of Merino wool base layers, including shirts, technical tops, and leggings.
This next layer is generally responsible for insulation. It traps air warmed by your body when it escapes from the base layer. More than one mid layer can be worn at a time, depending on how cold you are. The mid layer should also be moisture-wicking and quick-drying. You don’t want moisture to get trapped between the base and mid layers. That’ll just weigh you down and feel uncomfortable. Ideally, you want a garment that isn’t too heavy or bulky, too, since you’ll have to carry it if you don’t wear it. Look for items made from polyester fleece or stuffed with either a down or synthetic fill.
This layer goes on top of everything else and is responsible for keeping wind, rain and snow off of you. Because they are made to repel moisture and block winds, shell layers are typically not very breathable. That means that they’ll reduce the effectiveness of any wicking properties of other clothes you have on. Shells are divided into three different styles: hard, soft and insulated. One material that is particularly favored in this area is GORE-TEX. It tends to be one of the more breathable materials that still stops moisture and wind from reaching the body. Arc’teryx offers some GORE-TEX shells.
Using a combination of these three layers of clothing will allow you to prepare for both expected and unexpected weather without leaving you wishing you’d brought along that one thing you left behind.
Text by Bo King
Wanting to get out and explore? Find what you need for your next winter adventure here.
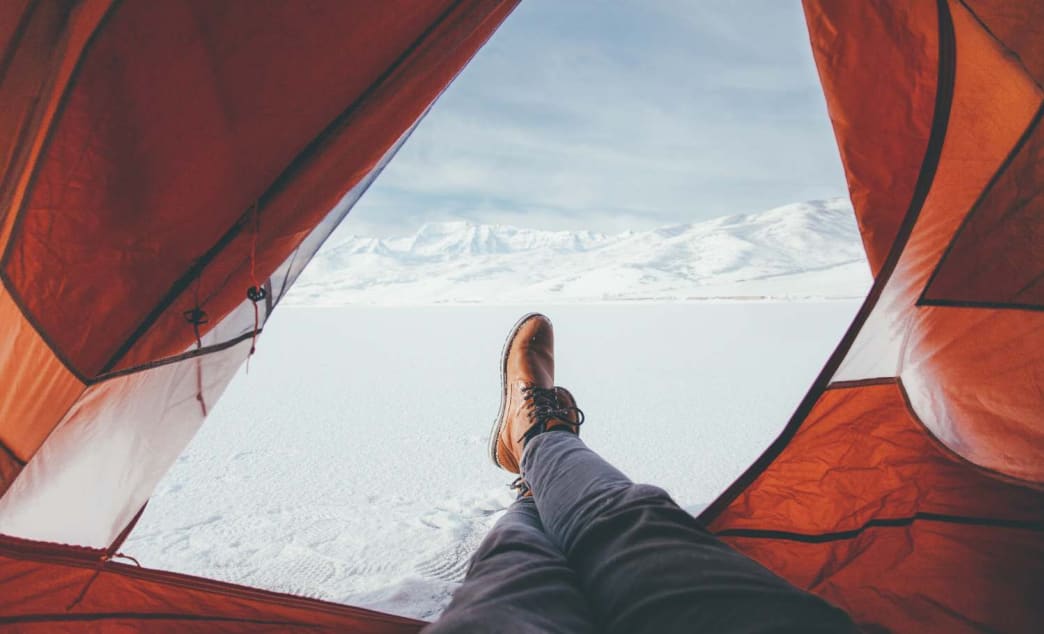
The trails are devoid of human life, animals wander freely through the woods, and snow falls soundlessly on the treetops—it’s wintertime in the great outdoors. But despite the sparkling vistas, uncrowded trails, and the beauty nature offers to hikers in this time of the year, many never experience the wonder that the fourth season offers because of one tiny detail: the cold.
What most people don’t know is that a little know-how, the right equipment, and simply wearing multiple layers can help with the challenges of camping in the winter. With some planning, you’ll easily stave off frostbite, sleepless nights, and never-ending shivers, all while enjoying beautiful natural sights.
Don’t fear the cold
“Winter is one of the best times to be outdoors,” says Tayson Whittaker, winter camping enthusiast, and founder of outdoor gear and clothing company Outdoor Vitals. He cites seclusion, wildlife activity, and the peace and quiet of a landscape covered in snow as some of the reasons you’re just as likely to find him setting up camp in the snow as next to a field of spring flowers.
To him, it’s easy to explain why more people aren’t outside, experiencing the magic of seeing a herd of elk feeding amid freshly fallen snow: “It’s plain and simple fear—fear of being cold, of doing something they haven’t, of the unknown, of the hypotheticals,” Whittaker says.
But to be fair, there are plenty of hypotheticals regarding cold that would deter someone from camping in the middle of winter: frostbitten extremities, feet that won’t thaw, a chill that never abates, nights spent awake and shivering in a frosty tent, wet gear, and worst of all, hypothermia. Whittaker has personally suffered through most of these situations, but he says preparation can make it easy for anybody to avoid them.
Choose the right gear
Popular Science
While warm temperatures rarely require hefty sleeping bags or insulated sleeping pads, winter temps demand you be familiar with your gear and what it can handle. But fear not—this doesn’t necessarily mean you have to spend a lot of money on new equipment. “You don’t have to reinvent the wheel,” Whittaker says. “A lot of times, you can take the gear you have and stretch it to work in that forth season.”
Start with a warm enough sleeping bag for the temperatures you anticipate. (Keep in mind men’s and women’s bags are rated differently, since women tend to sleep colder.) If you don’t think your current bag will do, you still might not have to shell out several hundred dollars for a new one—you can often spend less than $50 on a sleeping bag liner or a backpacking quilt and layer the bags.
But that’s just half the battle. A sleeping pad designed for winter is what separates you from the frozen ground, so it’s also of the utmost importance. Choose an insulated variety with an R-value (an insulation rating used from everything to sleeping pads to the fiberglass you stuff in your walls) of at least four, or simply stack an inflatable pad on top of a closed-cell foam pad for extra insulation from below.
Next, mind your tent: “Make sure you have a shelter that can handle a bit of a snow load,” Whittaker says, warning that if it can’t, the entire structure could cave. Four-season tents are designed to handle harsh winter conditions and the extra weight of snow, but they are expensive and less commonly stocked at your local outdoor retailer. A three-season shelter will do the job, too, as long as it’s freestanding. But Whittaker recommends avoiding single-wall tents or semi-freestanding tents that don’t have sturdy frames, since they are more likely to bow and collapse under a few inches of build-up.
As for boots, opt for an insulated pair. If they have removable linings, keep them in your sleeping bag at night so you don’t have to put your feet in cold boots in the morning. You can also keep your boots in a zip-top bag inside your sleeping bag to prevent them from freezing in extra cold temperatures.
Keep everything dry
Popular Science
Wet gear is often the first sign that trouble is on the horizon. That’s because if your jacket, sleeping bag, or boots get wet in the winter, they won’t dry out as quickly as they would in warmer weather. In fact, if temperatures are below 32 degrees Fahrenheit, they’ll freeze before they dry.
That’s why keeping everything as dry as possible is crucial. And that goes for clothing and gear alike. These are the maxims you need to abide by:
Keep tents, clothing and sleeping bags in waterproof stuff-sacks inside your backpack.
Don waterproof gloves and keep a spare pair handy in case they get soggy.
Wear waterproof boots and gaiters to keep the snow from soaking your socks and always carry several extra pairs.
Be particularly careful with the clothes you sleep in. A warm base layer and a dry pair of socks are vital when it’s time to turn in for the night. Don’t even try sleeping in the same damp clothes you hiked in—you’ll be in for a long, miserable night.
Layer it up
“Have a layering strategy,” Whittaker says about clothing. Don’t just throw on a long-sleeve shirt and a jacket—you’ll have no wiggle room if you get too cold or too warm. Instead, start with a warm synthetic base layer, add a mid-layer such as a fleece, wool shirt, or mid-weight jacket, then top it all off with a waterproof layer. Make sure you remove layers when you start to sweat and add them back on when you begin to cool down.
But whatever you do, avoid cotton. Once the material gets wet, it doesn’t dry easily, which means that unless you want to suffer from hypothermia, you won’t be able to wear it again.
Whittaker also suggests ditching some of your down when you’re winter camping—if it gets wet, it loses its insulating power. Instead, opt for synthetic insulation in jackets and other clothing layers. Whittaker does make a case for down socks which, according to him, are the only down garment he wears in the winter. He recommends them for use inside your tent and to keep your feet warm overnight.
As for your hands, treat them like you do the rest of your body, and dress them with layers. Start with a snug synthetic base layer such fleece or nylon, which will wick moisture, provide warmth, and allow dexterity when it’s time to light your stove or set up your tent. Then layer with a waterproof glove or mitten, adding one additional layer in between for extra warmth if you feel you need it.
For your feet, start with a synthetic layer, then a thick pair of wool or synthetic socks. Make sure your boots are big enough to accommodate these layers (one size larger than what you would normally wear should do) or circulation may be restricted, which will not only be uncomfortable, but will keep you feeling cold.
Tips for winter camping
Popular Science
One of the upsides to camping in the snow is that you won’t have to bring as much water as you would in warmer weather. You can use clean, fallen snow and melt it in a pot over the fire until it comes to a boil—this will kill viruses and bacteria and make it safe for drinking or cooking.
Speaking of snow, stomp down on and compress the snow where you plan to place your tent so you start with a flat surface and don’t sink throughout the night. Don’t forget the area around your vestibule, either—it’ll give you a place to stash your bag and climb out of your tent without tumbling into deep snow.
If you’re worried about fingers and toes getting too cold, bring along single-use hand- and foot-warmers, or fill a water bottle with hot water before bed. Place it in your sleeping bag to help warm you up at night, but make sure the lid is on tight so you avoid getting burned or soaking your gear.
But you’re not the only one who has to keep warm: make sure your batteries, GPS, cell phone, and other devices don’t freeze, since they won’t hold a charge if they’re cold. During the day, keep them near your body in an interior jacket pocket, and store them in your sleeping bag at night. Most bags even have a special zipper pocket near your chest for this purpose.
Get out there
Don’t let winter weather keep you indoors. Instead, protect your stuff from the damp, choose gear wisely, layer up, and don’t let the thermometer readings frighten you out of enjoying the season.
“If you can backpack in the other seasons, you can backpack in the winter,” Whittaker encourages. “It’s not as scary as you think.”
Written by Alisha McDarris for Popular Science and legally licensed through the Matcha publisher network. Please direct all licensing questions to legal@getmatcha.com.
Wanting to get out and explore? Find what you need for your next winter adventure here. We want everyone to enjoy the outdoors, and we work to build loyalty one connection at a time. Visit one of our stores or take advantage of our shipping or curbside pickup! #BeOutdoorsrs
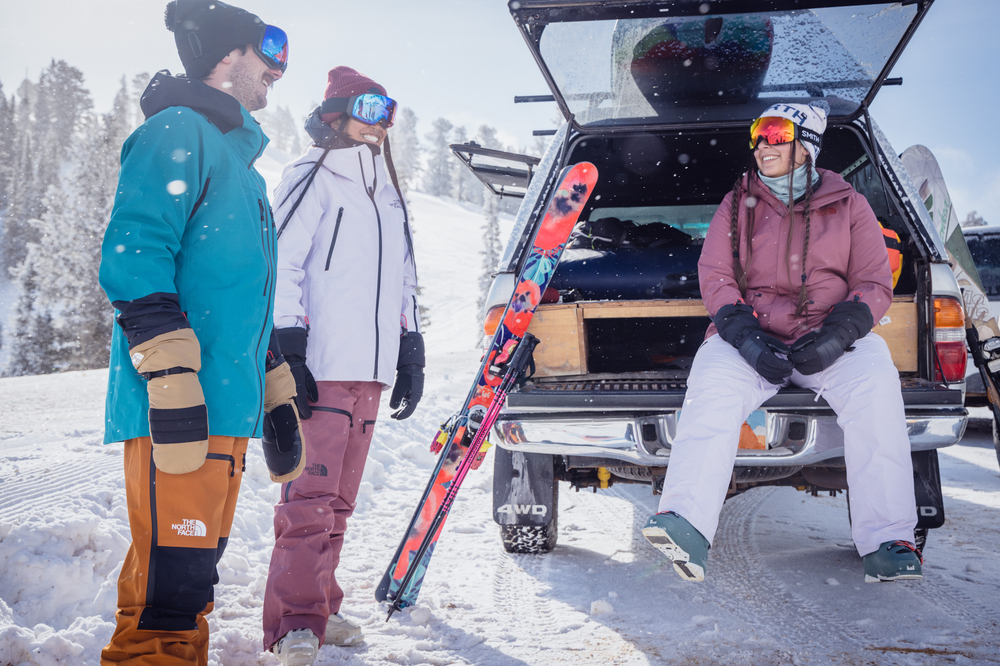
At Alabama Outdoors, we love skiing! While it may not be as popular here as it is up north, we’ve got you covered with essential ski gear and all the insider info. So if it’s your first time heading to a slope, check out our top 5 tips to enjoy your trip to the max!
Buy the right gear, rent the rest
Skiing takes a lot of gear. Between the skis, boots, and poles, there are also jackets, pants, helmets, goggles, beanies, socks, and more. Don’t sweat trying to buy everything; renting is essential. The nice part about ski gear is that you can wear some styles daily, so consider buying versatile ski gear. Look for beanies that you’d rock in the fall, a triclimate jacket with zip-in liner, and wool base layers. Triclimates can go from a thick winter jacket to a lightweight rain jacket or a warm midlayer in seconds. And wool baselayers are perfect for winter camping down south. So you can get the most out of your gear! Here is what you (need) to buy, and what you should definitely rent:
Rent:
Skis/ snowboard
Poles
Boots
Helmet
Buy:
Goggles
Ski gloves
Ski apparel & other accessories
Layer, layer, layer
Versatile gear is great, but just as important is layering. The key to staying comfortable on the slopes is wearing multiple layers. We go over it more in detail on this blog How To Layer Clothing, but the basics are simple. First, you want a moisture-wicking base layer made of wool or polyester, these will be your best friend all day. Then, you need a midlayer that’s thick enough to keep you warm but thin enough to breathe, like a fleece or hoodie. And finally, you want a waterproof shell layer that locks out moisture and vents heat. You can check out our favorite layering pieces here.
Protect your skin
One of the easiest mistakes is not taking care of your skin. Whether it’s chafing, sweating, exposure, or getting a sunburn, skincare is crucial for a fun ski trip. The best way to avoid skin issues is quality base layers. Base layers should wick moisture, regulate temperature, and reduce friction to prevent blisters. Cover your face with a thin, breathable neck gaiter or ski mask on the extra-cold and windy days. And make sure it’s adjustable so you can uncover your face and breath easily. Always make sure to apply sunscreen- even if it’s cold! Being at a higher elevation, you will get sunburn much quicker, so keep that in mind and remember to reapply and keep your skin and yourself hydrated! Another usually underrated accessory is socks. Don’t grab your old cotton socks from your dresser and think- “ah, these will work”. Find a ski-style sock that reaches up to your knees with minimal seams and is made of moisture-wicking materials, like your base layers. Check out our favorite ski accessories here!
Pack essentials plus extras
Snacks, water, sunscreen, lotion, and extra accessories like a beanie and buff can make or break your trip. If you’re staying far from the slope these are great extras to have on hand. An extra beanie and buff are perfect for swapping out midday if they’re gotten wet or icy. It’s good to swap out beanies and face masks to avoid sweat building up and keeping you cold.
Prepare to relax & have fun
Pack for some serious relaxation too. Not only is the ski slope great for shredding, but there are lots of fun ways to relax there, too. Whether it’s curled up by a fire, going for a winter walk, or spending time with a warm cup of coffee on a chilly porch enjoying the view, you’ll need extra clothes for lounging. That’s why we love the Free Fly Bamboo Fleece Hoodies.
We hope this has helped you prepare for a great time in the wintery outdoors on the slopes! If it’s your first time or you only get to go so often, just remember to listen to your body and not overdo it. Relax and have fun and be sure to plan ahead to make this trip an all-around stellar time!
Planning a ski trip this season? Find what you need for yourski trip or winter adventures here! We want everyone to enjoy the outdoors, and we work to build loyalty one connection at a time. Visit one of our stores or take advantage of our shipping or curbside pickup! #BeOutdoors
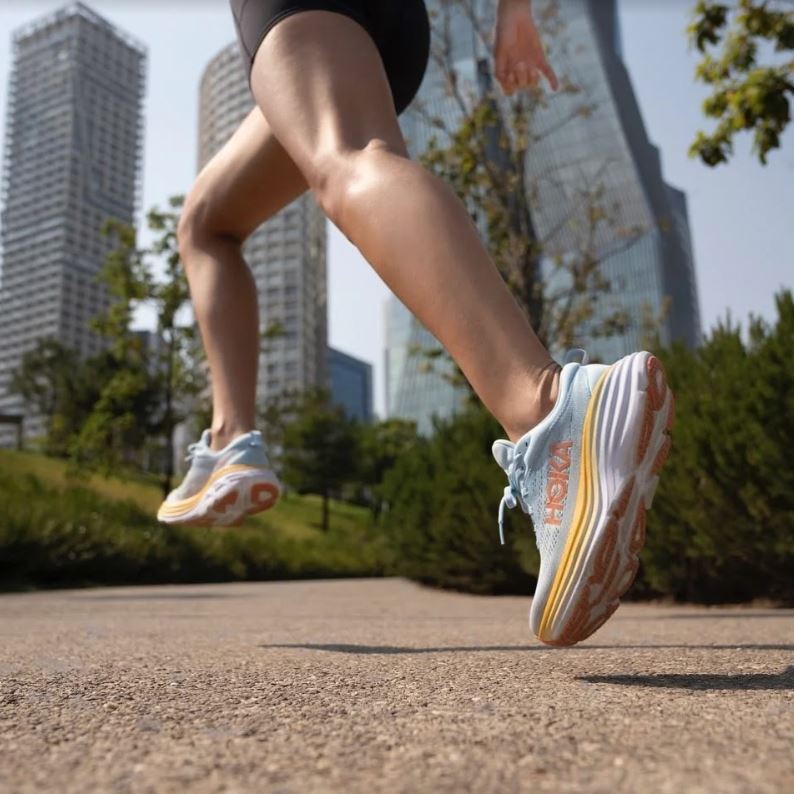
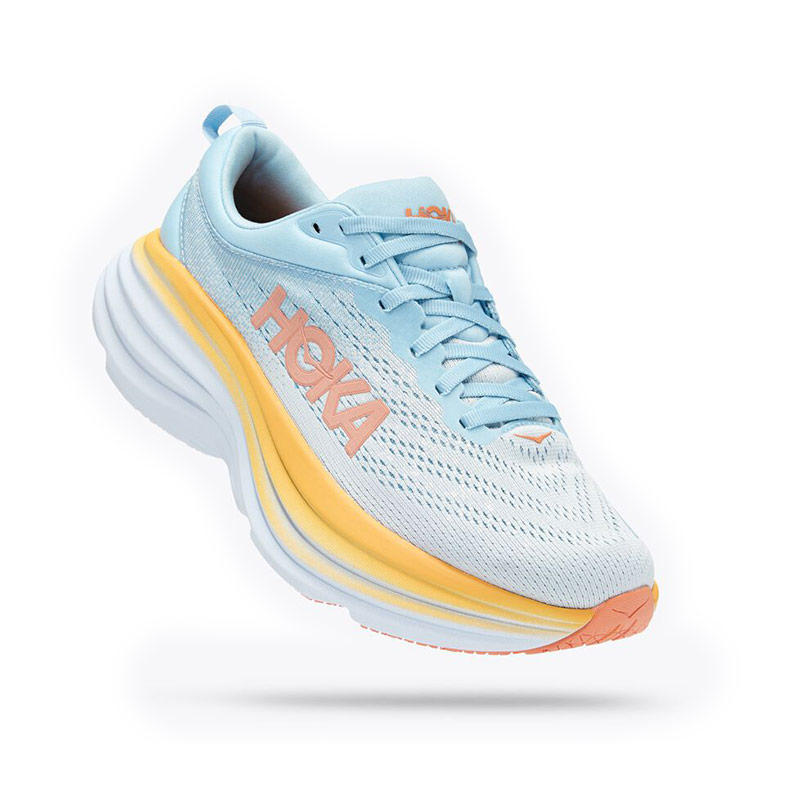
The all-new Hoka Bondi 8 Running Shoe is a revolutionary shoe, redesigned.
With high-tech features like a new foam sole compound, a reconfigured upper, and a better fit for superior performance. Take a deep dive with us as we break down what’s new and why you’re going to love it.
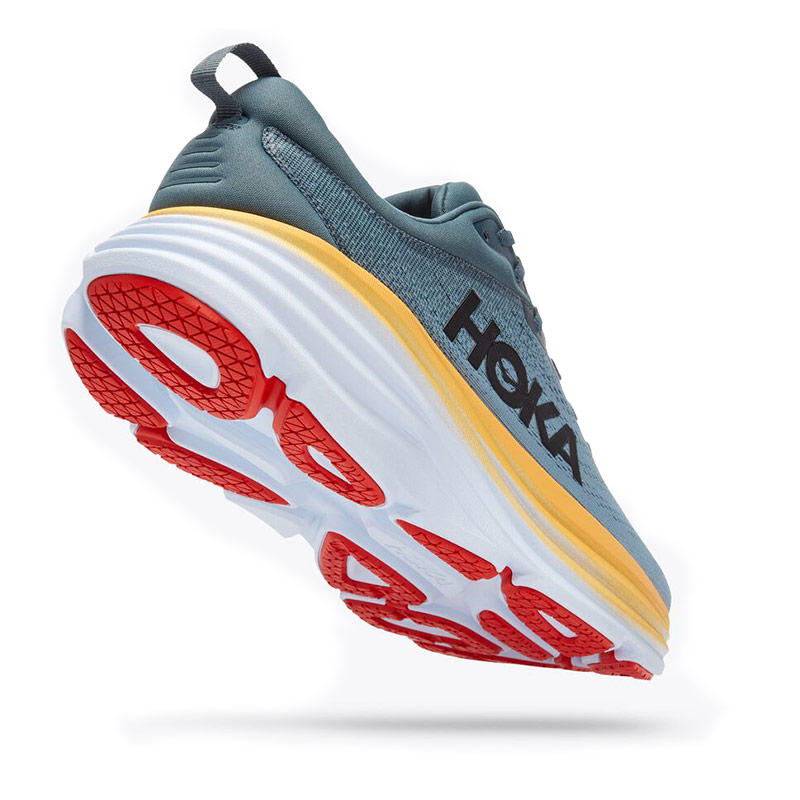
Building on the foundation of previous models, this update redesigned the sole. The low-profile foam and sturdier midsole make them perfect for long runs, walks, or shifts on your feet. The changes include an updated midsole composition with an extended heel for extra support. The billowed grooves on the side provide added impact protection. This midsole design gives this model a bouncy, responsive feel that keeps you on the move. While previous styles were often pillow soft, they didn’t provide the necessary firmness to support your feet. This style solves those issues with flexible cushions and superior support. And the outsole is more durable than ever thanks to targeted rubber abrasion pads. ShopMen’s. Shop Women’s. Shop allBondi 8.
The redesign also features an all-new upper .
With an integrated memory foam collar, a more plush mesh, and a more tapered fit, it’s ready to go for summer runs. The integrated memory foam collar provides key structural support. That support keeps your ankles comfy without compromising on performance. The plush mesh upper provides room to stretch and lets your feet breathe. Thanks to the technical mesh construction, it doesn’t add extra weight, and still cradles your foot. The updated taper fit is a better option for narrow feet, and the style comes in a 2E width as well for wider feet. The upper comes together to create a structured, breathable design that’s light enough for easy runs.
This update transforms the Bondi from a squishy, pillow-soft trainer into a competent and supportive recovery shoe with the cloud-like feel you love. If you’re staying on your feet and need soft support over long distances, this shoe is for you. From long runs to long shifts, comfort doesn’t stop with the Hoka Bondi 8 Running Shoe. ShopMen’s. Shop Women’s. Shop all Hoka.
Love Hoka but looking for a different style for your activity? Shop all Hoka styles here!
Find your favorite back-to-school apparel and gear at Alabama Outdoors. We want everyone to enjoy the outdoors, and we work to build loyalty one connection at a time. Visit one of our stores or take advantage of our shipping or in-store pickup! #BeOutdoors
Do you find yourself frequently replacing non-biodegradable Styrofoam coolers? Maybe you’re just really excited for National Cooler Day on May 27th and want something new to celebrate with! Or have you been disappointed that your ice melts after a couple of hours in the cooler that your family has used since you were a young explorer? If so, it’s time for a cooler upgrade.
Like technology, sleeping pads, and water bottles, coolers have come a long way thanks to brilliant material and outdoor experts. From weatherproof outer materials to excellent insulation techniques, coolers are now made to suit your lifestyle. They keep your contents cold for days when you are out camping and some are even built to be bear-proof, yes bear-proof.
So whether your adventures take you near or far, bear country, or the beach, there is a cooler to fit your needs. Check out our guide below to find the cooler right for you!
How will I use the cooler?
Are you a big camper? Do you find yourself going on a short day hike and wishing you could’ve packed a small lunch and some ice-cold beverages? Do you like to hunt or deep-sea fish? If you answered yes to any of those, a new cooler will be your best sidekick. Depending on what you are using the cooler for, there are multiple styles and sizes for you to choose from!
What to keep in mind:
Material (soft-sided or hard cooler)
Size
Weight (empty and filled)
Portability
Ice and temperature retention
Do I need a soft or hard cooler?
Due to the difference in weight between the two styles, your activity and usage for the cooler will determine which one is best for you.
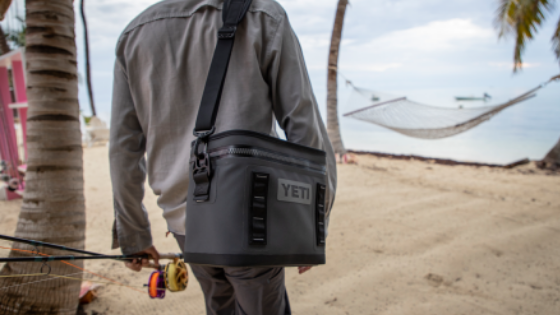
Soft-sided coolers are more portable because they are lightweight. If you plan on going more than a short distance, a soft-sided cooler is recommended- more specifically a backpack cooler. Do not let the fabric outer layer mislead you, though. The best coolers are constructed with durable fabrics that are waterproof and resistant to mildew, punctures, and UV rays.
So go ahead and take it to the beach, take it through some treacherous trails, it’s sturdy. Do they really keep your contents cold and ice from melting? YES! With leak-proof sealed zippers and added insulation, these can keep ice cold for days under the right circumstances and elements.
When to use a soft-sided cooler:
Hiking
Kayaking
Walking any substantial distance to your destination (backpack coolers are great here)
Lunch bag for work
Hard-sided coolers will keep your contents colder for a longer time because they are better insulated. The rotomolded plastic constructed with insulation makes these nearly indestructible and built to stay ice-cold even in the hottest conditions. Fun fact: Yeti hard coolers are grizzly tested, and bear-proof. So on your next camping trip to bear country, make sure you keep your food in a Yeti Tundra.
When to use a hard-sided cooler:
Hunting or fishing
Backyard BBQ
Car camping
Tailgate
Boating
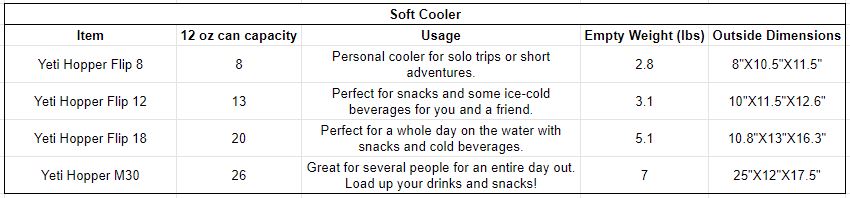
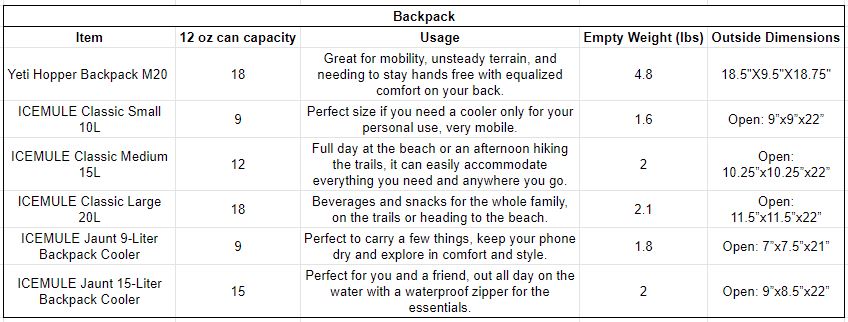
What size cooler do I need?
By now you have been able to determine what you want to use the cooler for, where you are going with it, and if you are interested in either the soft or the hard cooler. Now you can decide what size you will need. See below for a comparison chart to determine what size you need.
Pre-chill your cooler. Either with ice, ice blocks, or if it will fit, in a freezer.
Ice blocks will keep your food and beverages colder longer as they have a longer melting time.
Use ice cubes to fill the spaces and holes around your content that your ice blocks can’t reach.
Use twice as much ice as your contents.
Less opening of the cooler will give the cooler a better performance and keep your contents cooler longer.
Don’t drain the water!
Dry ice is best but ONLY for hard coolers.
Keep your cooler in the shade when possible or cover it with a towel.
Get Ready for summer with fresh new arrivals for all of your adventures. Alabama Outdoors wants everyone to enjoy the outdoors, and we work to build loyalty one connection at a time. Visit one of our stores or take advantage of our shipping or curbside pickup! #BeOutdoors
Trail shoes versus hiking shoes. Light hiking boots versus trail-running shoes. Outdoor shoes are confusing sometimes. Use the guide below to learn more about each style and figure out what’s best for you.
Once you’ve determined all your feet’s needs using our guide, you can start looking at what kind of shoe you’d like. We’ve broken these different styles down below with some recommendations at the end.
6 different styles of outdoor shoes
Hiking sandals: The hiking sandal is a lightweight sandal upper with a hiking-style sole. These are best for quick adventures where you want a versatile pair of day-hike shoes that can get wet.
Hiking shoes: The trail shoes are best for day-hikes and weekend adventures. The best hiking shoes have a technical upper and midsole without the ankle support of boots. These are a good option if you have ankle pain or don’t want something too warm. If you have problems with rolling ankles or stability issues though, a full boot may be better.
Hiking Boots: The boot is an above-the-ankle style hiking shoe with full control. These are a staple of hiking for a reason. The best hiking boots give you full control and ankle support and keep you comfortable mile after mile. While some dislike the extra weight and stifling warmth, boots are your best bet for support.
Trail-running shoes: The trail-running shoe is an upgraded version of the running shoe. Trail-runners take the core of a running shoe and add a grippier outsole, sturdier midsole, and a water-resistant upper. As a result, they’re durable shoes that take on anything. The advantage to trail runners is their breathability and comfort. They can, however, wear down easier and don’t offer the exact support you need for walking.
Light-hikers: Light-hiker is a term for hiking boots/shoes made with lightweight, synthetic materials. They’re breathable, lightweight alternatives to old-school boots. If you prefer a breathable shoe with less support and comfort than traditional boots, consider a light-hiker. They are best for shorter trips and hotter environments.
Approach shoe: An approach shoe is a combination of climbing and hiking shoes. Approach shoes are designed for hiking, “scrambling”, and light climbing. Approach shoes handle day-hiking well but are specifically made for climbing.
Now that you’re familiar with these styles, check out some of our suggestions. There are plenty of shoes and boots that fit each need, but we’ve shared our favorites to help you pick. If you’re still on the fence, stop by one of our stores or reach out online via email or on the phone!
For injury prevention:
The full-height boot is best to accommodate ankle and foot problems. While you sacrifice some breathability, extra support and control are essential to keep you safe. You can also look at dedicated hiking shoes if you prefer. A shoe is a better option than a boot if you struggle with ankle/calf swelling or hot spots.
Our favorite:
Keen Targhee II Mid Hiking Boots – These are mid hiking boots with a mesh and nubuck leather upper. The removable metatomical dual-density EVA footbed is perfect for flat feet.
For warmer weather:
Try a light-hiking option or a non-waterproof trail running shoe. Oftentimes, these stripped-down shoes are the most breathable and still provide support. For day hikes on maintained paths, you don’t always need the extra weather resistance. High-quality wool hiking socks are often all you need.
Our favorite:
Altra Men’s Lone Peak 6 Trail-Running Shoes – These low-top running shoes are great for wider feet with unrivaled trail support. Thanks to the aggressive tread and the breathable mesh upper, they’re a great choice for hot hikes.
For mixed-use:
If you don’t want a dedicated pair of trail shoes and only need a supportive option for short hikes, try a more dedicated running shoe. Running shoes provide all the support of a trail shoe in a lighter package. And while they aren’t made for serious terrain, they’re still great on maintained trails. Plus, you can go from the gym straight to the trailhead!
Our favorite:
Hoka Men’s Clifton 8 Running Shoes – These versatile running shoes feature a plush midsole with a breathable upper. For short trips on well-maintained trails, they’re supportive and comfortable enough.
For your first real pair of hikers:
When you’re ready to upgrade from your starter boots, check out a mesh option. These padded yet breathable uppers are perfect for long thru-hikes. They’re versatile enough for three-season use.
Our favorite:
Salomon Men’s X Ultra 3 Mid GTX Hiking Shoes – These trail-running inspired boots are perfect for hiking. The rugged Missiongrip outsole and tech lacing upper have unlimited grip. The breathable upper makes a world of difference in sweltering heat.
For versatile trail-use:
If you want trail-running performance that can still tackle day hikes, check out trail-running shoes from On, The North Face, and Salomon. These are great for maintained trails.
Our favorite:
On Men’s Cloudvista Trail-Running Shoes – These trail-running shoes combine a light mesh upper with a Missiongrip outsole. Their breathable design is perfect for hot trails while the DWR coating keeps out moisture. Go as fast or as slow as you want with superior control and light, breathable design.
For a spare pair of trail shoes:
Check out some hiking sandals. They’re great as camp shoes. Since they strap onto the side of your pack, won’t hold water, and can make runs to the camp store, they’re all you need. If you’re car camping and don’t want heavy-duty boots, a pair of hiking sandals are a great alternative. And if you’re around water, having a pair of sandals with a toecap is great for exploring waterways safely.
Our favorite:
Chaco Sandals – Try a pair of Chacos for versatile trail needs. From camp shoes to beach sandals, they do anything and everything comfortably.
So whether you’re heading out for a day-hike or hitting the trails for a while, step in confidence.
Wanting to get out and explore? Find what you need for your next adventure and explore the fresh. We want everyone to enjoy the outdoors, and we work to build loyalty one connection at a time. Visit one of our stores or take advantage of our shipping or curbside pickup! #BeOutdoors
When looking for new shoes, there are a lot of factors to consider. Outdoor shoes are easy to pick with this guide. And there’s a simple process to finding the best pair of hiking shoes. So follow along and use this guide to ensure you get the right pair of hiking shoes to enjoy your time outdoors.
To figure out what shoes are best for you, start by understanding your feet’s needs. This process is simple. First, you need to figure out your shoe size. It varies based on the manufacturer and the style. Check out some size guides from our top brands like On, Hoka, and Altra. The easiest way to get your shoe size is to stop by one of our store locations. There, you can get your size taken using a Brannock Device. This measures the length and width of your foot and identifies flat feet or arch problems. You can also measure your foot size at home following these simple steps.
The next piece is understanding your foot’s needs. Feet are a complex body part and shoes can make or break your time outdoors. We’ve broken down some basic considerations below and what factors to consider with each shoe component when shopping for your next pair of shoes.
Pronation vs supination
Pronation is the natural motion as your foot rolls from heel to toe while running or walking. While it is often seen as a bad thing, it’s normal for your foot to pronate a little bit. Overpronation is the real problem. Overpronation occurs when your foot overcorrects for this rolling motion and flattens your arch. This puts too much pressure on your arch, heel, and toes leading to issues with your foot and ankle. Overpronation is best solved with supportive and cushioned shoes. Some of the best options for overpronators are Hoka, Keen, and Altra.
Supination is the opposite of pronation. Supination occurs when your foot rolls too far outward. This causes extra pressure on your heel, toes, and ankles. It’s especially dangerous as your body distributes too much weight over the thinnest part of your foot. Supination is best treated with supportive shoes, like Overpronation. Check out support options from Keen, Salomon, and On.
Stability vs neutral
Shoes are often classified as either stable or neutral.
Stability shoes include extra support on the inside of the shoe to accommodate overpronation.
A neutral shoe is more balanced and features an even amount of support spread over the entire sole. Thanks to the more firm foam, neutral shoes are often better for those who want a fast and light option.
Always try on to find your perfect fit by following these steps:
First, shop for shoes when it’s warmer out and at the end of the day. That way you can account for foot-swelling and get the best size. This also lets you test how breathable the shoe is.
Next, when you put them on but before you lace them up, knock the heel against a surface to set your foot as far back in the shoe as possible.
Then, lace them up. When lacing boots, be sure to avoid over-tightening them on hot spots. If your toes are in pain after a hike, try a looser lacing around the toebox. If you often feel numbness in your feet, try a lacing pattern that doesn’t cross over the top of your foot.
Finally, walk in them a lot. Walk on inclines and loose surfaces if possible, and up and down a hill.
If you aren’t able to shop for shoes in person, try getting something from a brand you’ve worn before. Shoe manufacturers use the same “last”, the wooden foot model that the shoe is constructed on. That lets you order with more confidence since you’re used to the fit.
When you start shopping for shoes you may find a lot of confusing information. Shoes are simple. The average pair of outdoor or trail running shoes feature these key parts:
Upper
The upper of a shoe is key to preventing pain and maximizing comfort. With a padded mesh construction, most outdoor shoes lock onto your foot from the heel. This keeps the midsole in place while ensuring your feet can wick moisture.
Key terms:
One-piece liner: A liner is a part of the shoe that lines the inside so the shoe fits your foot as one piece.
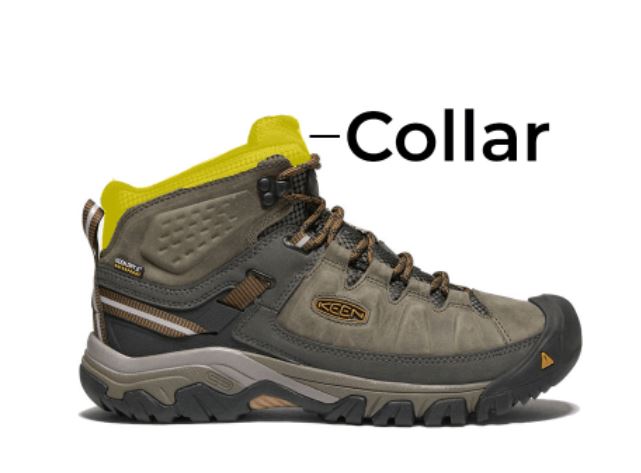
Collar: A shoe collar is a rigid piece at the top of the heel and around the top of the laces. The collar ensures the shoe holds its shape after you tie the laces. It also makes the shoe easy to put on. Some collars are a flexible knit material, while others are rigid foam blends.
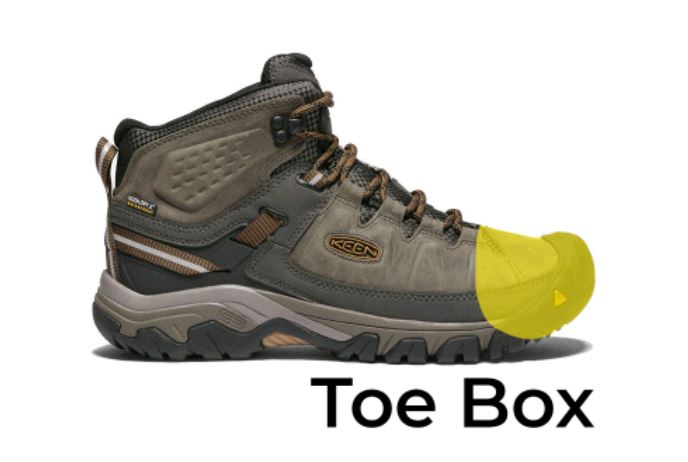
Toe box: The toe box is the upper section where your toes sit. Often, the toe box is the first part of your shoe to wear out due to constant friction from your pinky and big toes. Shoes with a wider toe box, such as Altra’s, will help if you have this issue.
Upper: An upper features a combination of polyester mesh and other materials to create a padded, breathable structure. Mesh is preferable for day hiking and running thanks to its breathability and comparable support.
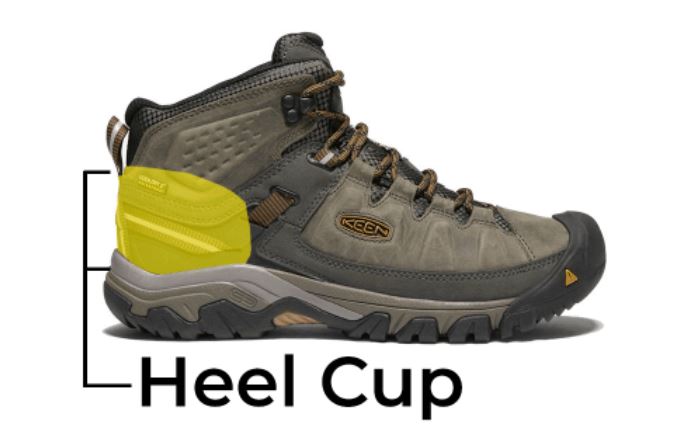
Heel cup: The heel cup is the back part of the midsole. It’s a critical part of the shoe. The heel cup keeps your shoe from slipping down at the back and maintains the structure of the shoe as you walk. Heel cups use a firm plastic that curves around the back of your foot to provide rigidity. The most important factor with heel cups is to ensure your shoes fit and feel good on long hikes.
Waterproofing
Waterproof hiking boots come in three main options. These include waterproof membranes, a chemical treatment, or a water-resistant shell. These range from how water-resistant they are and how breathable they are. The more breathable a waterproof treatment is, the less waterproof it usually is. We’ve summarized these options below. Check out the descriptions below to ensure you pick the best waterproofing option for you!
DWR: Durable water-resistant chemical treatment is the standard waterproofing option. DWR is a moisture-wicking chemical layer that coats porous fibers. This prevents them from absorbing water but is small enough to not block airflow. Oftentimes a DWR isn’t considered a “fully waterproof” option since you can’t submerge the boots. The DWR option is great for day hiking shoes that might only handle a bit of ambient moisture from mud and rain.
Waterproof membrane: A membrane is overlapping layers of mesh and polyester. The top layer is often a waterproof layer with tiny holes, smaller than a water molecule, that let the shoe breathe. The inner layers provide a cushion and space for moisture to flow off your skin. The membrane is best for thru-hiking and camping on the trail, as the waterproofing keeps your feet dry. This option isn’t as breathable, so get moisture-wicking hiking socks like Smartwool or Swiftwick. Most use either Gore-Tex or their own
Water-proof shell: A shell is the most water-proof option. A shell is a fully waterproof outer without a “membrane”. Shell options are made for technical needs like mountaineering or similar terrains. A shell option is best for navigating snow. There are some hybrid shell options, like Sorel Duck Boot. These have a breathable leather upper with a full rubber toe cap and outer.
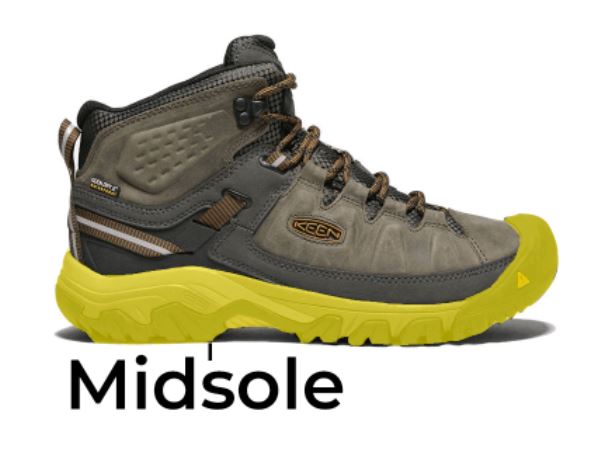
Midsole
The midsole of your shoe creates stability and support. Modern shoes utilize a blend of plush EVA foam with a sturdy TPU foam inside for support and structure.
Key terms:
EVA Midsole EVA is a type of foam found in shoes. These midsoles are popular thanks to their responsive and comfortable foot feel. It’s also very durable and maintains its support for a long time. It’s rare to find outdoors shoes made without EVA foam, but pay attention to a “TPU” foam as well. TPU is a denser foam that provides more support for more technical options. TPU is often found in approach shoes, mountaineering boots, and trail runners.
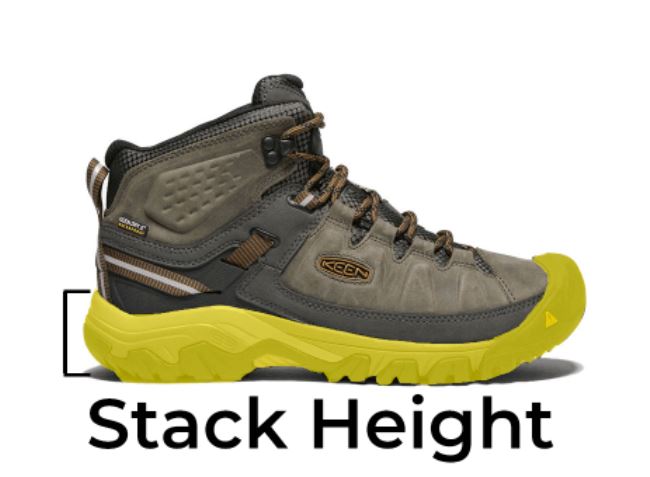
Stack Height The stack height is the height of the actual sole, from the bottom to the insole where your foot sits in the shoe. This measurement lets you know how bulky the outsole is.
Shank: A shank is a rigid piece of plastic that runs the length of the outsole. It provides structure and keeps the shoe rigid through the stepping motion. Then, the shank flexes and provides the “bounce” as you roll your foot forward.
Outsole
The outsole provides the necessary grip and structure to move you forward. Some shoes use a proprietary outsole called Missiongrip™. Missiongrip™ features a special diamond shape and rubber compound. When looking for trail shoes, the sole only makes a difference if you’re running versus hiking. Trail-running shoes need an aggressive tread, with deep, grippy channels and lugs. Hiking shoes need a wider, stable forefoot with grippy heels.
Key terms:
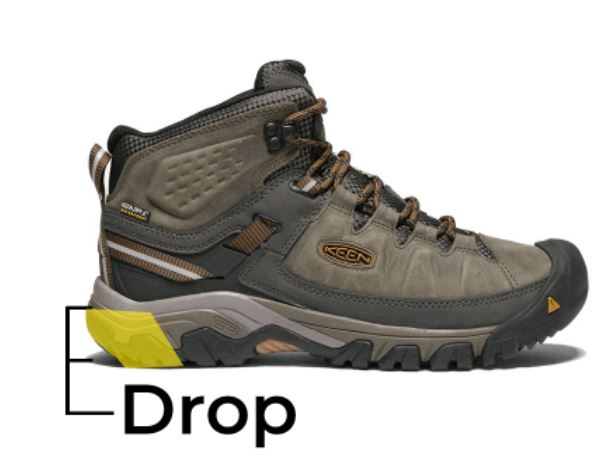
Drop: A shoe’s drop is the distance from the highest part of the outsole down to the lowest part. It measures how much curve there is in the shoe’s sole. This helps you figure out if the shoe is a good fit for your foot. While the average shoe has a 6mm drop, like Hoka or On, some have an 8-10mm drop like The North Face. Other brands like Altra are famous for having a 0mm drop and can be a good option for flat-footed hikers.
Missiongrip™/rubberized outsole: Some shoes use a proprietary rubber blend for their outsoles. The Missiongrip™ outsole technology from On Running specifically use a diamond-shaped tread with a super-sticky rubber for long-lasting performance. Other outsoles use specially formulated rubber to maintain grip.
Now that you’re familiar with the components of outdoors shoes, you can shop with confidence. Check out part two of our outdoor footwear guide, launching Thursday April 21, 2022, for an explanation of different outdoor shoe styles and which one is best for you!
Wanting to get out and explore? Find what you need for your next adventure and explore the fresh. We want everyone to enjoy the outdoors, and we work to build loyalty one connection at a time. Visit one of our stores or take advantage of our shipping or curbside pickup! #BeOutdoors
It’s important to clean and repair your gear before using it on an adventure.
Spring adventures are right around the corner and chances are your outdoor gear is stuffed in a closet from your last Winter trip. It’s time to make sure your gear is in tip top shape for your next trip!
After getting home from spending time in the great outdoors, whether it’s a day hike or weeklong camping trip, the last thing anyone feels like doing is cleaning their gear. All too often, exhaustion and procrastination win out, and people tend to stuff their dirty, grimy gear in the far corner of a garage only to discover that, come spring, their tent or backpack has become a Petri dish of nasty stuff. To make matters worse, people often store gear in places where heat and humidity, rodents, and cold temperatures can degrade or even destroy fabrics, stitching, glue, and other components.
If that scenario sounds familiar, fear not: With a little know-how and elbow grease, you can save your trusty tent and hiking boots from a similar fate. Here’s what to know about spring cleaning your outdoor gear, plus insider tips on how to give your backpacks, tents, sleeping bags, and footwear a little TLC before you hit the trail this season.
Backpack Care
Cleaning
So, your backpack smells like a locker room trash can. The odor is likely due to sweat, dirt, and that food bag you forgot to empty—all of which not only stink, but can shorten the life of your pack. Another damaging element? Salt from sweat, which can corrode the metal in zippers and breaks down nylon fabrics.
But cleaning your backpack involves a bit more than just tossing it into the washing machine. In fact, don’t even think about doing that: The agitation from a machine can break down fabrics as well as foam in hip belts, shoulder straps, and back panels. Also, straps can get twisted in the components of a top-loading washer.
Instead, first vacuum out dirt and debris. Then, add a delicate detergent to warm water and use a sponge or cloth to wipe the pack down. Some pack manufacturers also recommending avoiding hot water or spot removers, as these can damage the fabric.
As you clean your pack, examine the zippers, which can fail if they’re jammed with dirt and debris. You can vacuum out the dirt, or scrub zippers with a soft nylon brush (like a toothbrush) and cold water.
After you wash the bag, don’t put it in the dryer, either: The heat levels are too intense and can break down fabrics and foams. A good way to dry your pack is to stuff it with newspapers and hang it in the shade.
Storing
Once you’ve cleaned your pack, store it in a cool, dry place, and hang it if possible. Don’t leave your pack on the garage floor, because standing water or other liquids like engine oil could seep into the pack and damage it. Also, if your pack is on the floor, mice can chew through the fabric while searching for crumbs.
Tent Care
Check your tent zipper for holes in the fabric from abrasion or snags, and be sure to clean the teeth of gunk or dirt build up.ih
Cleaning
When you return from camping in the rain, it’s critical to dry your tent to prevent mildew and fungus from forming. The primary problem is that these elements will damage coatings on tent fabrics. Plus, they’ll make the tent stink.
If you do get mildew, it’s very difficult to remove it completely, but you can treat it with a mixture that includes non-detergent soap and one cup each of salt and lemon juice, plus one gallon of hot water. Use this solution and a soft nylon brush to scrub the interior and exterior of the tent as well as the fly. Next, dry the tent in the sun. As with packs, you shouldn’t put your tent in a dryer because excessive heat will damage the fabric and coatings.
Storing
It’s fine to store your tent in its stuff sack. The primary concern is to prevent the tent fabric from being exposed to heat and sunlight over a long period of time. If you pitch your tent in the backyard for a campout with the kids, for example, don’t leave it up for weeks at a time. As with your pack, it’s best to store the tent in a cool, dry place off the floor.
Sleeping Bag Care
Front-loading machines are better for washing down products, especially your sleeping bag. Marcus Woolf
Cleaning
During an extended camping trip, a sleeping bag can get pretty ripe. When you get home, use non-detergent soap, water, and a soft brush to clean dirty spots on the shell. Don’t forget to clean the interior of the hood and collar where oil from your body can collect.
If your bag is really grimy, it’s best to wash it at a laundromat, because front-loading machines there won’t agitate the bag as much as your home machine. Also, commercial machines are larger and clean the bag more thoroughly than smaller home machines. It’s important to never wash a bag in a top-loading machine with an agitator, because it could rip the bag and stress fabrics and seams. Also, don’t dry clean a down bag, because the process can break down natural oils in the insulation.
At the laundromat, use cold water, a gentle cycle, and either mild soap or a special cleaning solution designed specifically for down insulation or synthetic insulation. While cleaning the bag, you can also use a special spray to restore its DWR (durable water repellent) coating. You can usually find the cleaning solutions and DWR spray at an outdoor gear store.
Storing
You shouldn’t store your bag in its small stuff sack, because over time compressed insulation will lose its loft and its ability to keep you warm. Many bag manufacturers supply a larger net bag for long-term storage, or you can hang the bag in a large cotton sack or even a large pillowcase.
Footwear Care
Some shoes are beyond repair, but cleaning and drying footwear properly can extend the life of your gear. Marcus Woolf
Cleaning
Over time, dirt, mud, and sand can deteriorate the leather in boots and shoes and cause wear and tear on the fabrics and stitching in synthetic footwear. So, to properly care for your boots and shoes, within a day or so of returning from a trip, clean them with a brush and water or a cleaner that the manufacturer recommends. Avoid using detergents and bar soap, because they can harm leather and waterproof membranes in footwear.
Drying and Storing
When drying footwear, remove the outsoles and let them air out. It’s best to dry footwear in the house, because you want a cool, dry place that’s not especially humid (especially important in the hotter months in Alabama). If you want shoes or boots to dry faster, put them in front of a fan and stuff them with newspaper. Avoid drying them next to a heater, which can harm the glue and leather in footwear. Also, shoes or boots can break down more quickly if you store them in a place with extreme temperatures or poor ventilation, such as a garage, attic, or the trunk of a car.
If you plan to hike with fairly old shoes or boots, examine them and take them for a test run before you embark on a big trip. Over several years, the glue used to secure the outsole of shoes can simply break down, especially if you’ve kept them in a garage or unconditioned storage facility. We’ve seen outsoles peel off a pair of old boots while a hiking partner was ascending a pass deep in the Sierra Mountains. Though it might make for a good story later, it’s no fun to hike with blown-out boots wrapped in duct tape.
Need patches for your tent, water repellent or just new gear? We have the Spring outdoor gear you need to get you back on the trails! We want everyone to enjoy the outdoors, and we work to build loyalty one connection at a time. Visit one of our stores or take advantage of our shipping or curbside pickup! #BeOutdoors
Written by Marcus Woolf for RootsRated in partnership with Blue Cross Blue Shield of AL and legally licensed through the Matcha publisher network. Please direct all licensing questions to legal@getmatcha.com.
 On Cloud Shoes come in a lot of different styles, supports, and sizes.